I have an object which is rotated and not parallel to any axis. The picture shows how it looks if I scale four vertices along the y-axis. How can I extend the vertices along the local axis of the object?
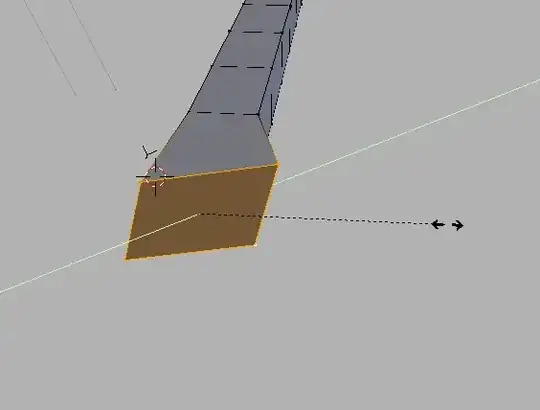
I have an object which is rotated and not parallel to any axis. The picture shows how it looks if I scale four vertices along the y-axis. How can I extend the vertices along the local axis of the object?
When you are in edit mode, select the desired vertices, press S, and then press either X, Y, or Z twice in a row.
After the first press it will transform along the global orientation as usual:

After the second press it will use the transform orientation selected in 3D view > header, which is set to local by default:

If the orientation is set to global pressing the axis key (X,Y,Z) twice will still use the corresponding local axis.
This solution does not work if the vertices were rotated in edit mode. For that you may have to change the transform orientation to normal, and manually move the edges.
Change your transform orientation to Local, then you can use the 3D Manipulator set to Scale.

In addition to iKlsR's answer, you can hit Y (or X or Z) twice after hitting G (or S or R), this will move along the object's local y, x, or z axis.
By default, all you have to do is press the axis key twice, e.g. SYY.

In most cases, pressing the axis key twice will use the transform orientation specified in 3D view > Header:

However there is one exception, as you can see in the gif above. Even though the transform orientation is set to Global, SYY uses the Local orientation.
This is probably because pressing the axis key once (SY) always uses global axes, and it would be pointless to have a setting where SY and SYY do the same thing.
Transform orientations are quite useful, and I recommend you have a look at the wiki if you haven't already.
Also note that you can define custom orientations with ⎈ Ctrl⎇ AltSpace, e.g.:

inN`, and they are not updated when the source (like the face here, or axes, etc.) change. Many thanks @gandalf3 for the hint with custom orientations!
– Simon A. Eugster
Apr 17 '17 at 09:27
You can change the transform handle space with the marked button:
 Changing it to local will make the transform in the objects local space.
If you change it to normal it will force to Z-axis to be parallel to the face's normal which is useful if the mech is rotated in edit mode.
To access the different spaces using keyboard shortcuts, after selecting one from the drop down menu you might need to double press the constrain axis