1

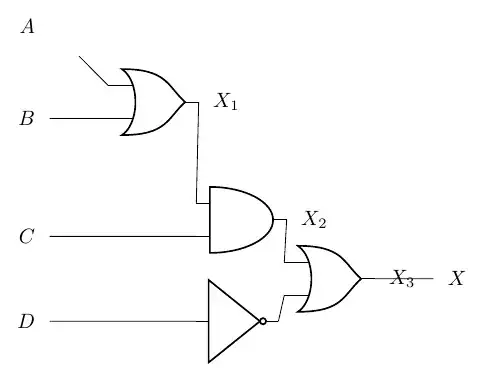
How do you code the following logic gate diagrams?

Complexity Complexity2 Complexity3 Complexity4 Complexity5

My current attempts:

\begin{circuitikz}
        %Top OR Gate
        \draw
        (0,-1) 
        node[label = left:$A$] {}
        to [short]
        (1,-1)
        node[american or port, anchor = in 1] (or1){}
        (or1.in 2)
        -- ++(-1,0)
        node[label = left:$B$] {}
        to[short]
        (or1.in 2)
        (or1.in 2)
        -- ++(-1,0)
        (or1.out)
        to[short] (2.5,-3)
        node[american and port, anchor = in 1] (and1){}
        (and1.in 2)
        -- ++(-2.5,0)
        node[label = left:$C$] {}
        (0,-5) 
        node[label = left:$D$] {}
        to [short]
        (2.5,-5)
        node[american not port, anchor = in 1] (not1){}
        (and1.out)
        to[short] (4,-4)
        node[american or port, anchor = in 1] (or2){}
        (and1.in 2)
        (not1.out)
        to[short] (4, 52 |- or2.in 2)
        (or2.out)
        -- ++(1,0)
        node[label = right:$X$] {}
        %labels
        (or1.out)
        node[label = right:$X_1$] {}
        (and1.out)
        node[label = right:$X_2$] {}
        (xor2.out)
        node[label = right:$X_3$] {}
        \end{circuitikz}

enter image description here

Rmano
  • 40,848
  • 3
  • 64
  • 125

1 Answers1

4

This is a possible solution; I heavily commented the code to show the reasoning behind it. I do not say this is the only way to do it; but notice that I use explicit coordinates (numbers) only where needed, so changing just one of it will change the spacing of the circuit, keeping it coherent.

\documentclass[margin=1cm]{standalone}

\usepackage{circuitikz} % IEEE standard ports are much nicer \ctikzset{logic ports=ieee} \begin{document} \begin{tikzpicture} % let's start with the first port. The ++(1,0) will select how much to the right % from the connection is. Change this to have more space, the rest will follow. \draw (0,0) coordinate (start) node[left]{$A$} -- ++(1,0) nodeor port, anchor=in 1{} (or1.out) node[right]{$X_1$}; % second input, below the first one % (X -| Y) means: go horizontal from X, vertical from Y \draw (or1.in 2) -- (or1.in 2 -| start) node[left]{$B$}; % the second port will be below and to the right the first one. \draw (or1.out) -- ++(0,-1) nodeand port, anchor=in 1{} (and1.out) node[right]{$X_2$}; \draw (and1.in 2) -- (and1.in 2 -| start) node[left]{$C$}; % now, if you really want the not at the same level of and1... % we move down for input 2 of and1 without stroking \draw (and1.in 2) ++(0,-1) node not port, anchor=in{} % we want the X3 label at the same x-position that X2 (not1.out -| and1.out) node[right]{$X_3$}; \draw (not1.in) -- (not1.in -| start) node[left]{$D$}; % trick here: put the next or midway from and1 and not1 \draw ($(and1.out)!0.5!(not1.out)$) ++(2,0) nodeor port{} (or2.out) node[right]{$X$}; % let do a nice connection here: |- means go vertically then horizontally \draw (and1.out) |- (or2.in 1); % a little bit trickier for the not, because it's shorter: let's go % horizontally until the above kink, and then |- \draw (not1.out) -- (not1.out -| and1.out) |- (or2.in 2); \end{tikzpicture}

\end{document}

enter image description here

Rmano
  • 40,848
  • 3
  • 64
  • 125