A "Magic Eye" image encodes the depth information into the repeating horizontal pattern such that "going cross-eyed" and matching up adjacent copies of the image fools our eyes into interpreting it as "depth". This can be demonstrated by looking at the following image :
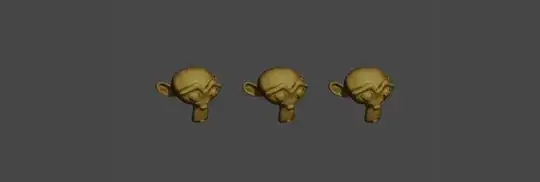
Look at the central image. Relax your eyes so that you're looking "through" the screen so that one eye is focussing on the middle one but the image of the left or right-hand one (which one you find easier will probably depend on your "dominant" eye) crosses over to coincide with the middle one and you should see 4 monkey heads (you may need to position your head closer or further from the screen for this one). This is essentially what you need to do with a "Magic Eye" picture - but with the repeating pattern coinciding with the adjacent almost identical clone of the pattern. Note that for this to work your head must be aligned left-right to the horizontal of the image.
The same principle is behind a full "Magic Eye" image - where two adjacent and almost identical sections of the pattern coincide from both eyes to fool your brain to perceive depth. This is achieved by using a 'seed' texture at one side of the image and cloning it across the page based on the 'depth' of the original rendering at that point. The wider the spacing between 'clones', the further 'into' the page the surface will appear. We can achieve this in the compositor by using the Depth information from the render to control the offset of a Displace operation to clone the seed texture across the image.
Start by generating the 'seed' texture. This can be any image but it needs to have enough contrast and detail. One edge of it will be used to clone and repeat over the final image to produce the effect (depending on which direction we're going to clone left-right or right-left). The distance between copies will fool the eye into seeing the depth at that point. For my initial renderings I simply used a Distorted Noise texture as shown :

The clone is achieved by using the Depth at each point in the render to displace the texture and using Alpha Over to combine with the previous image (so that it's a clone rather than just displacement). Note that anything outside the bounds of the image will be ignored (transparent) so that we don't copy from outside the image boundary over our seed. Everywhere else we'll get the texture displaced based on the distance at that point - so it will be a clone of the seed horizontally in the image.

Note the inputs of the groups are passed out to the outputs. This will allow multiple instances of the clone to be easily chained together.
Connect the clone up to the texture along with some nodes to adjust the raw Depth values to a suitable displacement distance. Note that smaller displacements will make for a "flatter" final result.

By repeating the 'clone' group mulitple times we effectively clone to each subsequent 'band' of repetitions of the seed. This can be visualised by taking a snapshot of the result at each stage along the chain :

Note how the initial 'seed' is cloned to create the first 'band' in the first frame and each subsequent stage leaves the left-hand region unaffected (since that's already a displaced clone of the section to the left, according to the depth map) and adds on the next 'band' which was previously just a displaced copy of the entire seed texture.
If there aren't enough bands to reach all the way across the image there will be "flat" regions on the far side - link in more copies of the 'Clone' group to resolve this (although the more 'Clone' operations you add, the more work the compositor will need to do to complete the render). The number of required iterations depends on the size of your Multiplier - larger values fill the image quicker by having a wider spacing (and so larger apparent depth). Smaller values give a shallower image but need more iterations since the bands are narrower and so closer together (meaning you need more of them to span the whole page).

Note that the Depth of the original render is Normalized so as to range from 0.0 to 1.0 and an offset (in this case 1.0) added to give a minimum spacing.
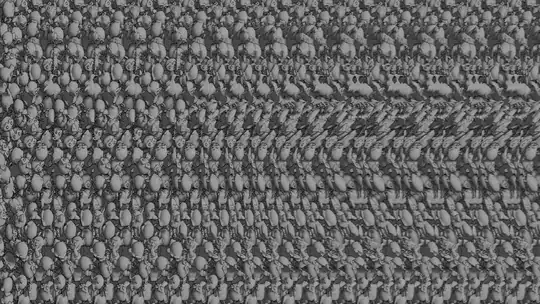
This produces the following result :

Any 'seed' image can be used - the only requirement is that it is varied and contains small and distinguishable details. I experimented with a family of monkeys as I thought that would be most appropriate :
Blend file included